Assembly instructions for pull handles
There are different application possiblities and accessories for the mounting of a pull handle. In the following you will find assembly instruction for
- EZ1060 Fixing as pair for wood/PVC/metal doors.
- EZ1061 Fixing as a pair for glass doors
- EZ1062 Bolt-Through fixing for glass doors with end cap
- EZ1079 secret fixing for wood/PVC doors
- EZ1080 secret fixing for wood/PVC doors
- EZ1065 Bolt-Through fixing for wood doors with end cap
- EZ1066 Bolt-through fixing without end cap
Important: Please remove the protective film only after completion of the building. During the construction phase the products in stainless steel are often treated inappropriately (e.g. the hands are contaminated with chemicals). Thus, you run the risk that rust film could appear. If you remove the protective film before completion of the building, rust will not be accepted as reason for complaint.
EZ1060 . Fixing as pair for timber, PVC or metal doors.
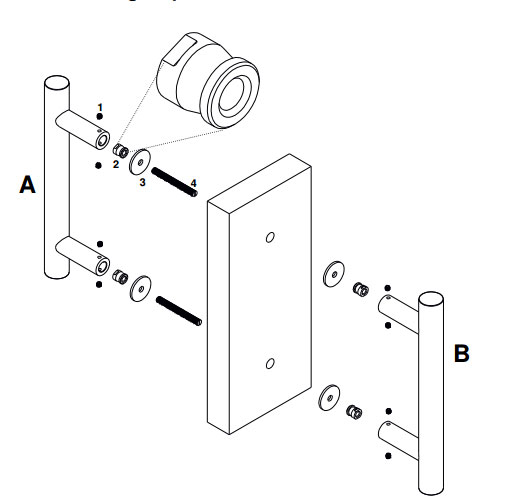
- a.) Measure the exact fixing centre
- b.) Transfer this fixing centre to the door
- c.) Drill two holes (ø 9 mm) through the door
- d.) Insert the bushing (2) [side A] in the pull handle socket. Pay attention to the correct direction.
- e.) Screw the threaded bolt (4) in the pull handle socket together with the bushing.
- f.) Insert the screwed threaded bolts through the drillings of the door.
- g.) Optionally you can use the washers (3) from both sides.
- h.) Screw the bushing (2) [side B] on the threaded bar (4) and tighten with an open-end wrench.
- i.) Afterwards put the pull handle socket on side B on the bushings (2) and fix the pull handles on side A and B with the enclosed 8 grub screws (1).
EZ1061 Fixing as a pair for glass doors.
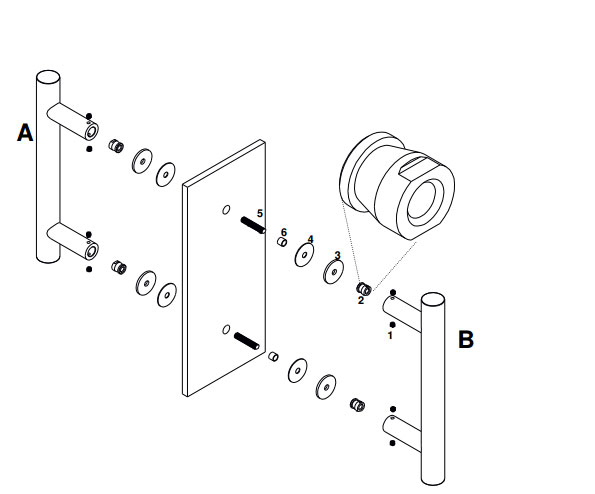
Your glass door manufacturer is responsible for points a), b) and c)
- a.) Measure the exact fixing centre
- b.) Transfer this fixing centre to the door
- c.) Drilling holes of ø 13 mm
- d.) Insert the bushing (2) [side B] in the pull handle socket. Pay attention to the correct direction.
- e.) Screw the threaded bolt (5) in the pull handle socket together with the bushing. f.) Put a metal washer (3) on the screwed bushing (5) first, then the plastic washer (4). The plastic washer (4) has to be on the glass door.
- g.) Put the rubber ring (6) on the threaded bolt (5) and insert the screwed threaded bolts (5) through the drillings of the door. The rubber ring (6) has to be in the drilling. h.) Put the rubber washer (4) [side A] on the threaded bolt first and then a metal washer (3)
- i.) Screw the bushing (2) on the threaded bolt (4) [side A] and tighten with an open-end wrench.
- j.) Afterwards put the pull handle socket on side A on the bushings (2) and fix the pull handles on side A and B with the enclosed 8 grub screws (1).
EZ1062 Bolt-Through fixing for glass doors with cap inside
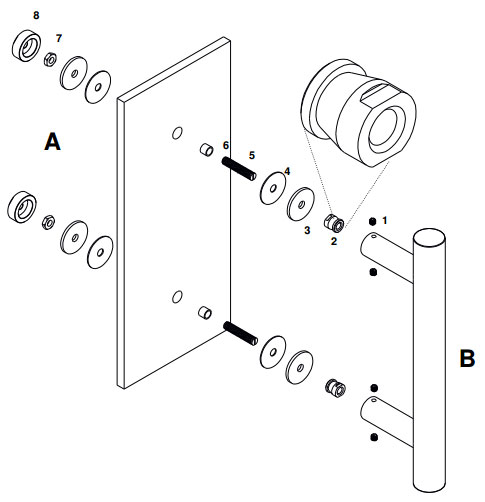
Your glass door manufacturer is responsible for points a), b) and c)
- a.) Measure the exact fixing centre
- b.) Transfer this fixing centre to the door
- c.) Drilling holes of ø 13 mm
- d.) Insert the bushing (2) [side B] in the pull handle socket. Pay attention to the correct direction.
- e.) Screw the threaded bolt (5) in the pull handle socket together with the bushing.
- f.) Put a metal washer (3) on the screwed bushing (5) first, then the plastic washer (4). The plastic washer (4) has to be on the glass door.
- g.) Put the rubber ring (6) on the threaded bolt (5) and insert the screwed threaded bolts (5) through the drillings of the door. The rubber ring (6) has to be in the drilling.
- h.) Put the rubber washer (4) [side A] on the threaded bolt first and then a metal washer (3)
- i.) Tighten the M8 hexagonal nuts (7) with a wrench
- j.) Screw the casing (8) on side B on the threaded bolt (5)
EZ1063 Secret fixing for timber doors
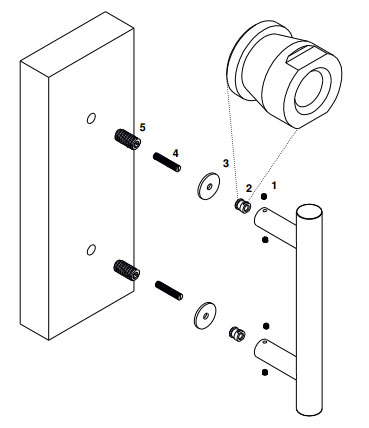
- a.) Measure the exact fixing centre
- b.) Transfer this fixing centre to the door
- c.) Drill ø 14 mm with a depth of approximately 35mm. Pay attention that you drill right-angled to the door leaf.
- d.) Screw with an allen key (SW8) the inside-outside threaded screw (Rampa) (5) into the door until it is planar. Screw the bolt screw (4) into the inside-outsinde threaded screw Rampa (5) until 10 still mm project from the inside-outside threaded screw (Rampa) (5). Optionallly put the metal washers (3) on the bolt screw.
- (4). Screw the bushing (2) on the threaded bolt. Pay attention to the correct direction when screwing the bushing.
- e.) Screw the inside-outside threaded screw (Rampa) (5) with the already pre-mounted bolt screw (4) and the bushing (2) in the previewed drilling right-angled and flush. Tighten with an open-end wrench.
- f.) Put the pull handle sockets on the bushing (2) and fix them with the grub screws (1)
EZ1064 Secret fixing for frame/PVC doors
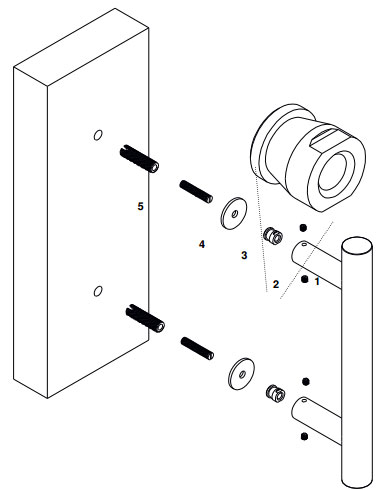
- a.) Measure the exact fixing centre
- b.) Transfer this fixing centre to the door
- c.) Pre-drill approximately ø 6 mm, then re-drill with ø 10,8 mm maximum with ø 11 mm (PVC doors with a steel core ø 11,3 mm – ø 11,4 mm) Pay attention that you drill right-angled to the door leaf.
- d.) Screw the bolt screw (4) into the inside-outside threaded screw (Rampa) (5) until 10 still mm project from the inside-outside threaded screw (Rampa) (5). Optionallly put the metal washers (3) on the bolt screw (4). Screw the bushing (2) on the threaded bolt. Pay attention to the correct direction when screwing the bushing.
- e.) Screw the inside-outside threaded screw (Rampa) (5) with the already pre-mounted spindles (4) and the bushing (2) in the previewed drilling right-angled and flush. Tighten with an open-end wrench.
- f.) Put the pull handle sockets on the bushing (2) and fix them with the grub screws (1)
EZ1066 bolt-through fixing without cover
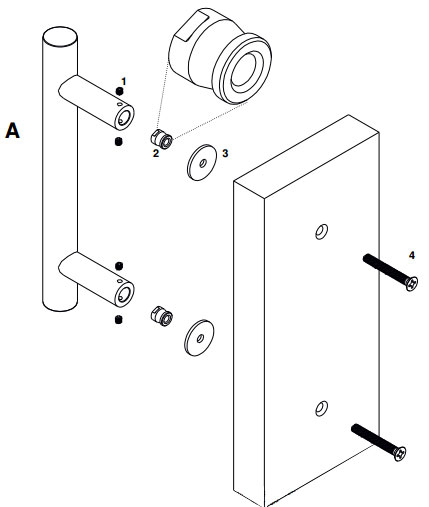
- a.) Please measure the exact fixing center
- b.) Transfer this fixing center to the door
- c.) Drill two holes (Ø9) through the door
- d.) Put the bushing (2) into the pull handle socket. Please take care for the correct direction.
- e.) Put the threaded bolt through the bore holes in the door
- f.) Optionally you could use the metal washer (3)
- g.) Fasten the threaded bolt (4) into the socket of the pull handle
- h.) Fix the pull handle with the grub screw.
Limited Warranty
Karcher GmbH ("Karcher") warrants to the original retail purchaser ("Purchaser"), but to no other person, that Karcher's products ("Products") shall be free from defects in material or workmanshipfor a period of one (1) year following the purchase of the Products from an authorized dealer. Karcher's sole obligation under this limited warranty shall be, at the option of Karcher, to repair or replace Products which Karcher determines, in its sole discretion, to be defective and which are returned to Karcher by an authorized dealer within one (1) year from the date of purchase of the Products.
Karcher does not assume any warranty responsibility for damage to the Products due to conditions over which Karcher has no control, including but not limited to ordinary wear and tear, improper installation or maintenance, alteration, impact, accident, misuse, tampering or abuse. Karcher assumes no responsibility for tarnishing, discoloration, excessive wear or deterioration of the surface finishes due to exposure to weather conditions over which Karcher has no control. Karcher assumes no responsibility for any defects or damage caused by the Purchaser or any third parties.
KARCHER MAKES NO OTHER WARRANTIES OF ANY KIND OTHER THAN THOSE CONTAINED HEREIN AND HEREBY DISCLAIMS ALL OTHER WARRANTIES, EXPRESS OR IMPLIED, WITH RESPECT TO THE PRODUCTS INCLUDING WITHOUT LIMITATION ANY WARRANTIES OF MERCHANTABILITY OR FITNESS FOR A PARTICULAR PURPOSE. THIS LIMITED WARRANTY IS IN LIEU OF ALL OTHER WARRANTIES, EXPRESS OR IMPLIED, AND IS LIMITED TO THE DURATION OF THE LIMITED WARRANTY PERIOD. IN NO EVENT SHALL KARCHER BE LIABLE FOR ANY SPECIAL, DIRECT INDIRECT, INCIDENTAL, OR CONSEQUENTIAL DAMAGES, INCLUDING, BUT NOT LIMITED TO LOSS OF PROFITS, PROPERTY DAMAGE, DAMAGES TO BUSINESS OR BUSINESS RELATIONS, OR DAMAGES FOR LOSS OF OPERATION. THIS WARRANTY REPRESENTS KARCHER'S SOLE LIABILITY TO THE PURCHASER FOR CLAIMS RELATED TO THE PRODUCTS WHETHER THE CLAIMS ARE BASED UPON CONTRACT, TORT, OR ANY OTHER LEGAL THEORY.
Karcher's total cumulative liability under this limited warranty, if any, is limited to the dollar amount of the Purchaser's original payment for the Products. The invalidity or unenforceability of any provision of this limited warranty shall not affect the validity and enforceability of any remaining provisions, and this limited warranty and disclaimer of liability shall be construed in all respects as if any invalid or unenforceable provision is omitted. Some states do not allow limitation on how long an implied warranty lasts or the exclusion or limitation of incidental or consequential damages so the above limitations or exclusions may not apply to you, the buyer.
This warranty gives you specific legal rights and may also have other rights which vary from state to state.
